Cloning an item
If authorized, you have the option of cloning (copying) an item. You can clone an item into the same section, a different section in the same battery, or a different battery altogether. You must have authorization to use the clone feature, plus authorization to access both the parent item's section and battery, and the destination's section and battery.
After cloning, the original item (parent) and the copied item (child) can evolve separately without having any impact upon one another. Later, a child can become the source for another cloning. In that case, the child now becomes a parent, and the copy becomes its child. Thus, a hierarchy (family tree) develops during the cloning process, and is recorded in the item's lineage.
The act of cloning copies the parent's stimulus and stem, options, rationales, and discrete meta-data (key, item writer ID, etc.) to the child. Cloning does not copy the parent item's statistics or forms history.
During cloning, you have the option of choosing a new status for the parent item, but you must choose a status for the child item. Each battery has a defined set of clone-in statuses.
To clone an item:
2. Navigate to the Lineage tab and click the item you wish to clone (highlighted in red, below):
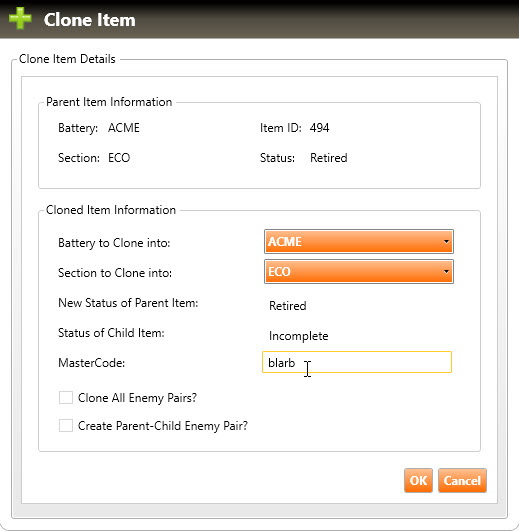
3. Click the Clone button. The Clone Item dialog box will appear:
4. Chose the battery and section you wish to clone the item into.
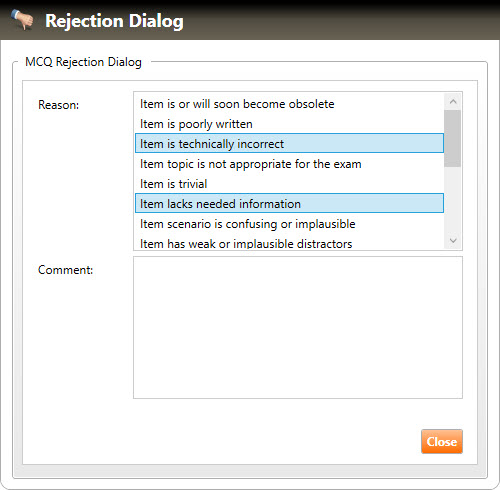
5. Click the OK button. A Rejection Dialog box will appear:
6. Enter one or more rejection reasons for the parent item by clicking on Reasons.
7. Enter any comments in the Comment field.
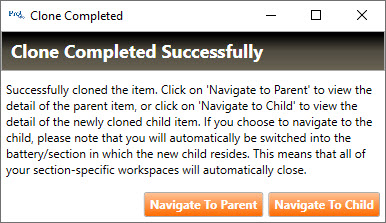
8. Click the Close button. The following dialog box will appear, allowing you to navigate to either the parent or child item:
9. Click the Navigate To Child button, then navigate to the child item's Lineage tab (highlighted in green, below):
10. In the example above, the MCQ lineage shows that Item 21341 is now a child of Item 494.
11. To move the child item to a different section or to assign it a new status, select the child item and click the Move Item button. A Move Item(s) dialog box will appear (highlighted in red, above).
12. Select a new section (from the Section to Move Item(s) to dropdown list) or a new status (from the New Status dropdown list) for the item, then click the OK button.
13. Click the Save button to save all changes.